
Quick start
For most ZPL files, the steps are the same: open the file, review the preview and ZPL source, make any necessary changes, and then export or print it.
- Open an existing file with Open ZPL. You can also drag it into Labeloid or double-click an associated
.zplfile in Windows Explorer. - Review the label preview and the ZPL source. For a multi-label file, use the page controls to review each label.
- If the source needs changes, edit it and click Apply. Apply immediately saves your changes to the current ZPL file on your computer and redraws the preview.
- Review the pages and any warnings, then use Save as to export the result or Print to open the print dialog.
Warning: Apply saves your changes to the current ZPL file and redraws the preview. The file is overwritten immediately on your computer, without a separate confirmation dialog.
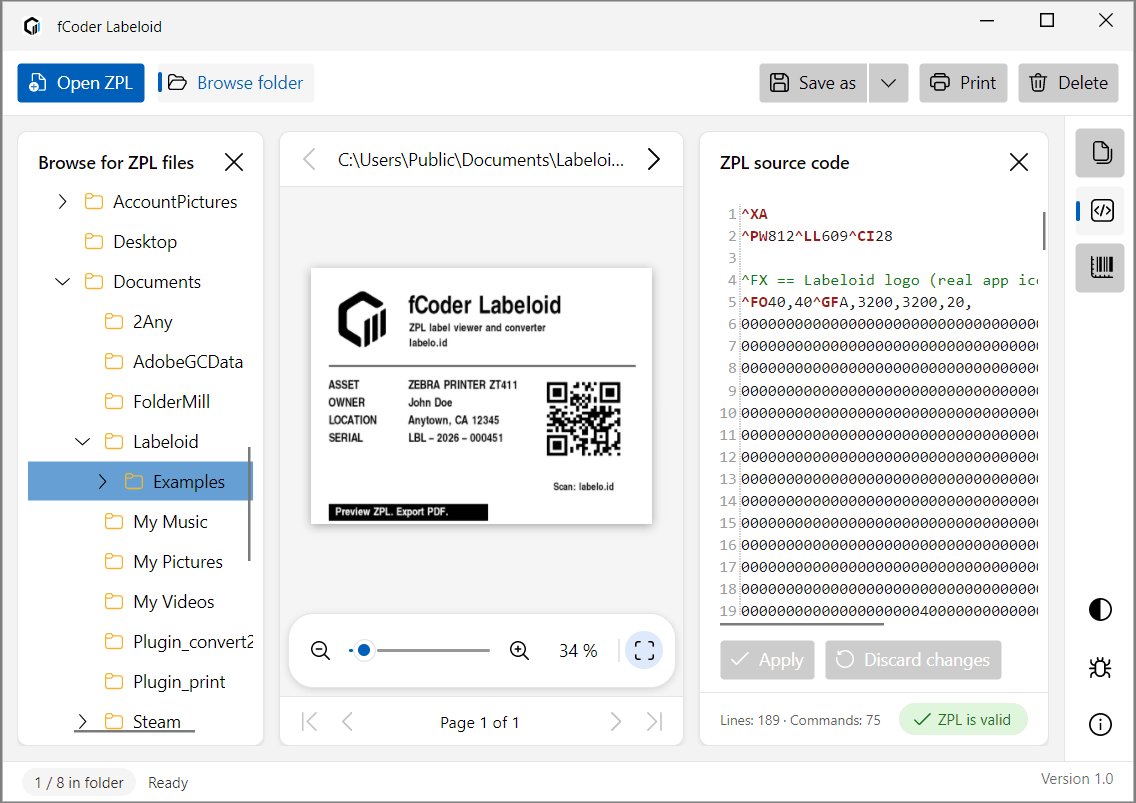
Open a ZPL file in Labeloid on Windows
You can open an existing ZPL file from the Windows file dialog, drag it into Labeloid, or use its file association. Each method opens the same workspace, with the label preview beside the ZPL source.
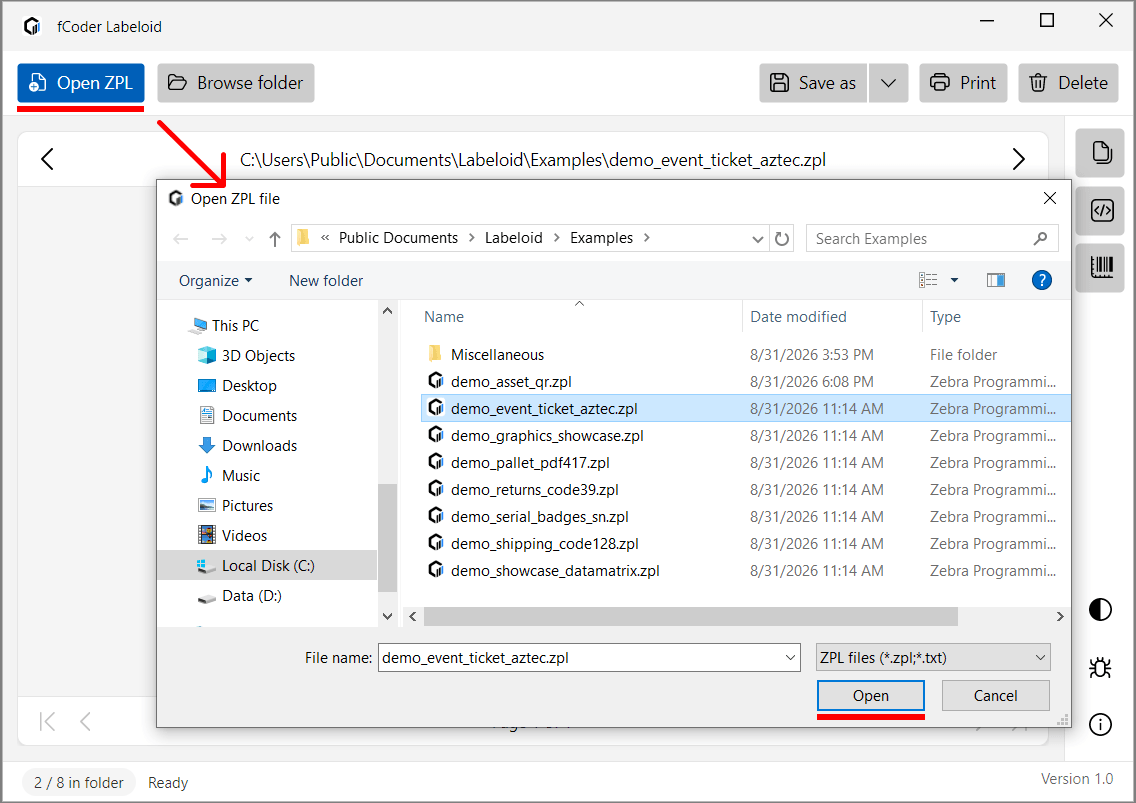
Use the Open dialog
- Click Open ZPL.
- Select the ZPL file you want to open.
- Click Open in the Windows file dialog.
Once the file opens, Labeloid shows the label preview and the ZPL source for review or editing.
Drag and drop a file
Drag a ZPL file from Windows Explorer into the Labeloid window. Labeloid opens and renders the file immediately.
Double-click a ZPL file
If .zpl files are associated with Labeloid, double-clicking one in Windows Explorer starts Labeloid or brings it to the foreground, then opens the selected file.
Associate .zpl files with Labeloid
The Labeloid installer can register Labeloid as the app for .zpl files in Windows. Once that association is active, double-clicking a .zpl file opens it directly in Labeloid.
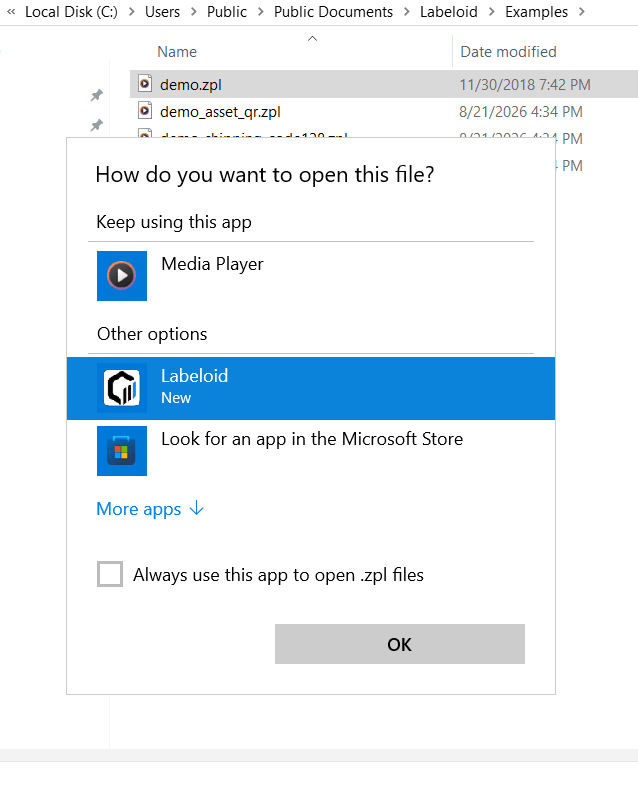
You can also set the association at the Windows level: right-click a .zpl file, choose Open with, select Labeloid, and choose the option that makes Labeloid the default app for .zpl files. If you do not want to change the default app, use Open ZPL or drag and drop instead.
Note: Labeloid works with existing ZPL files. It does not create new ZPL files from scratch.
Browse ZPL files and folders
Use Browse folder when you need to work with several ZPL files in the same folder. Labeloid builds a file list for that folder, so you can move between files without reopening the Windows file dialog.
- Click Browse folder and select a folder that contains ZPL files.
- Open a file from the folder view.
- Use the left and right chevron buttons beside the file path to move through the list. Their tooltips are Previous ZPL in the folder (←) and Next ZPL in the folder (→).
Labeloid scans only the selected folder. Files in subfolders are not included. Select a subfolder in the folder tree to browse it separately.
Labeloid does not update the file list automatically when new files are added to the folder. Select the folder again to update the list.
The status line shows your current position in the folder as N / M in folder. For example, 3 / 12 in folder means you are viewing the third file out of 12. At the first or last file, the corresponding Previous or Next chevron button is disabled.
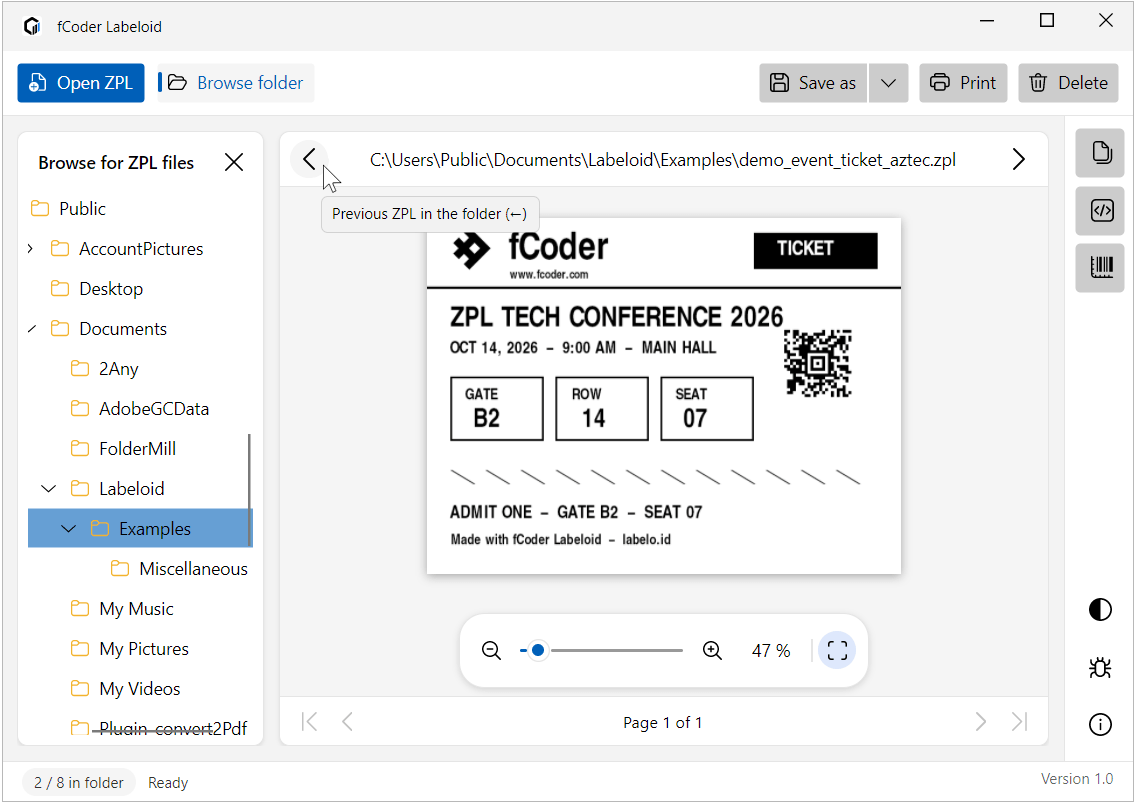
Preview a rendered label
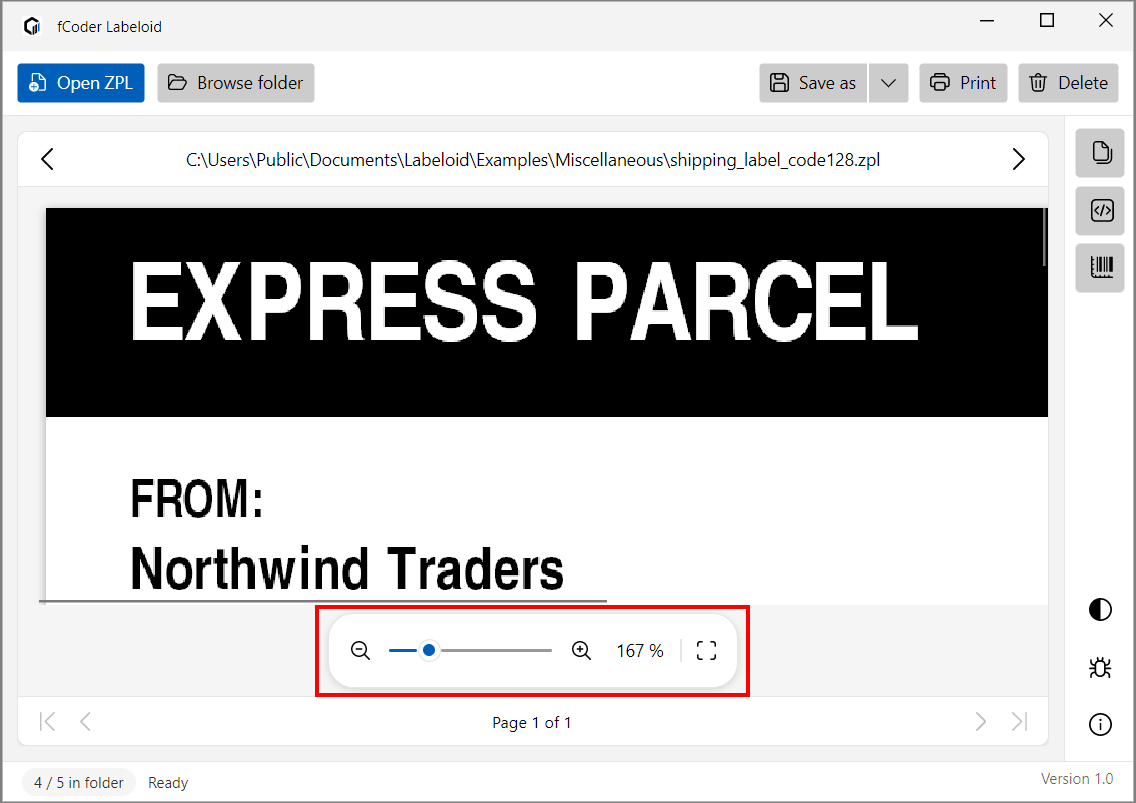
Labeloid shows one page at a time. Adjust the zoom when you need to see the whole label or examine a small element more closely.
| Control | Result | |
|---|---|---|
| Zoom Out | Reduces the preview scale. | |
| Zoom slider | Lets you set the scale manually. | |
| Zoom In | Increases the preview scale. | |
| Current percentage | Shows the current zoom level; click it to reset to 100%. | |
| Fit to window | Keeps the entire label inside the preview. |
If a zoomed label extends beyond the preview, drag inside the preview to move around the label.
Note: Fit to window remains active when you resize the window. A manual zoom adjustment turns Fit off.
Navigate a multi-label ZPL file
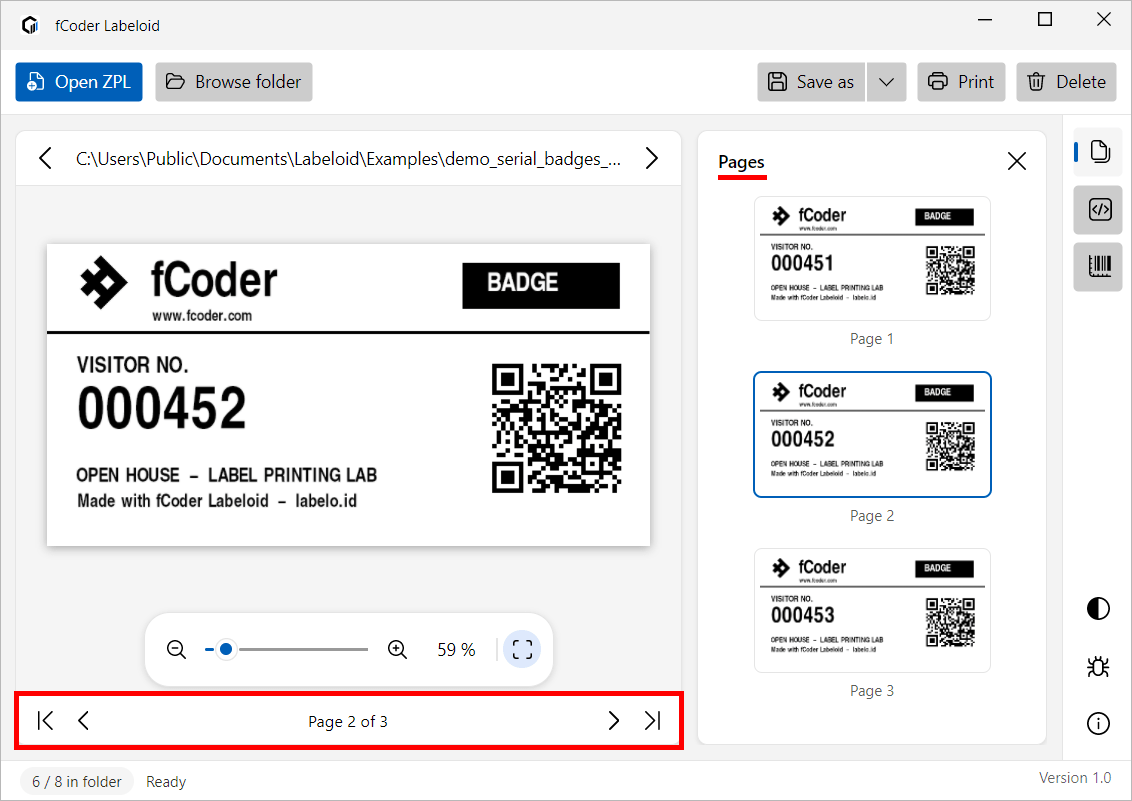
If a ZPL file contains several labels, Labeloid renders them as separate pages, like a multi-page document. Thumbnails and page controls let you move through all labels in the current ZPL file.
- Open the Pages panel to see the page thumbnails.
- Select a thumbnail to show that page in the main preview.
- Move through the file with First page, Previous page, Next page, or Last page.
Page X of Y shows the current page and the total number of pages in the selected range. PgUp and PgDn move to the previous or next page.
If you set a range in Rendering parameters, the page count changes to match it. Only pages in that range appear in the preview and exported output.
Inspect preview elements in ZPL source
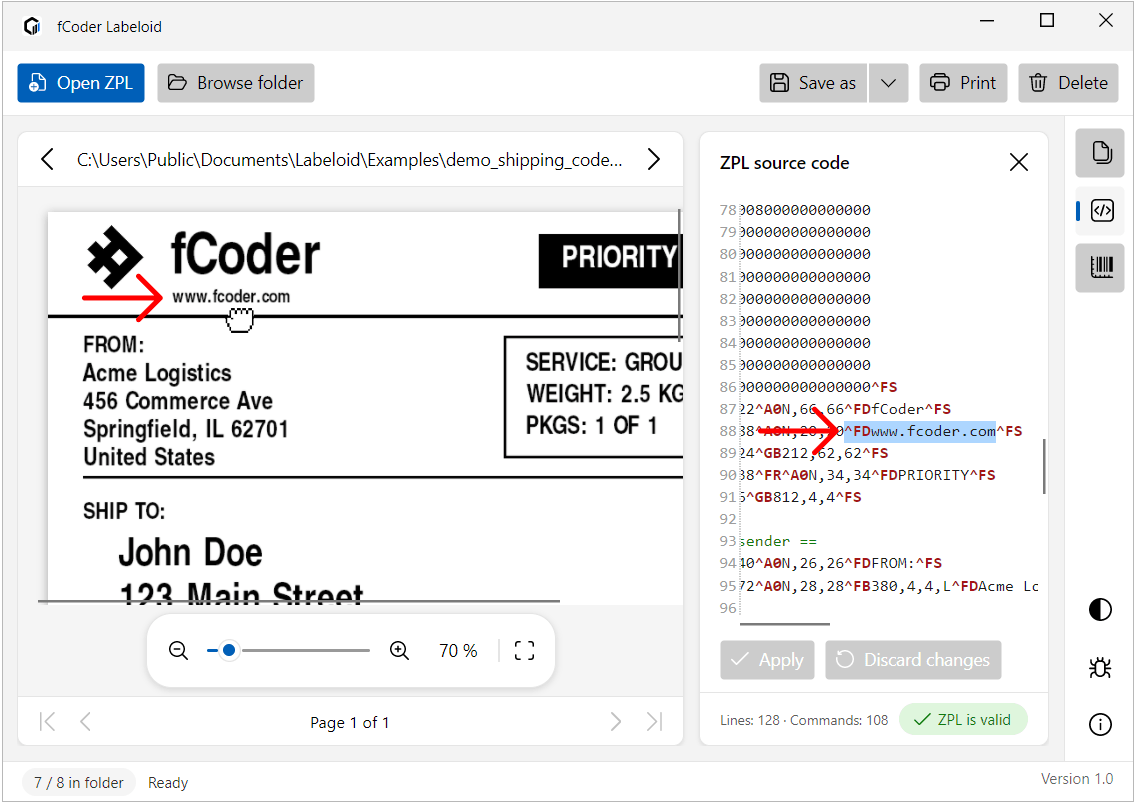
If you need to find the code behind a particular text field, barcode, line, or other label element, click that element in the preview. Labeloid highlights the related ZPL command or source fragment in the editor.
- Show the ZPL source code panel.
- Click the element you want to investigate in the preview.
- Review the source fragment selected by Labeloid.
Navigation works from preview to source only. Selecting a command in the editor does not locate the corresponding element in the preview.
Edit ZPL source
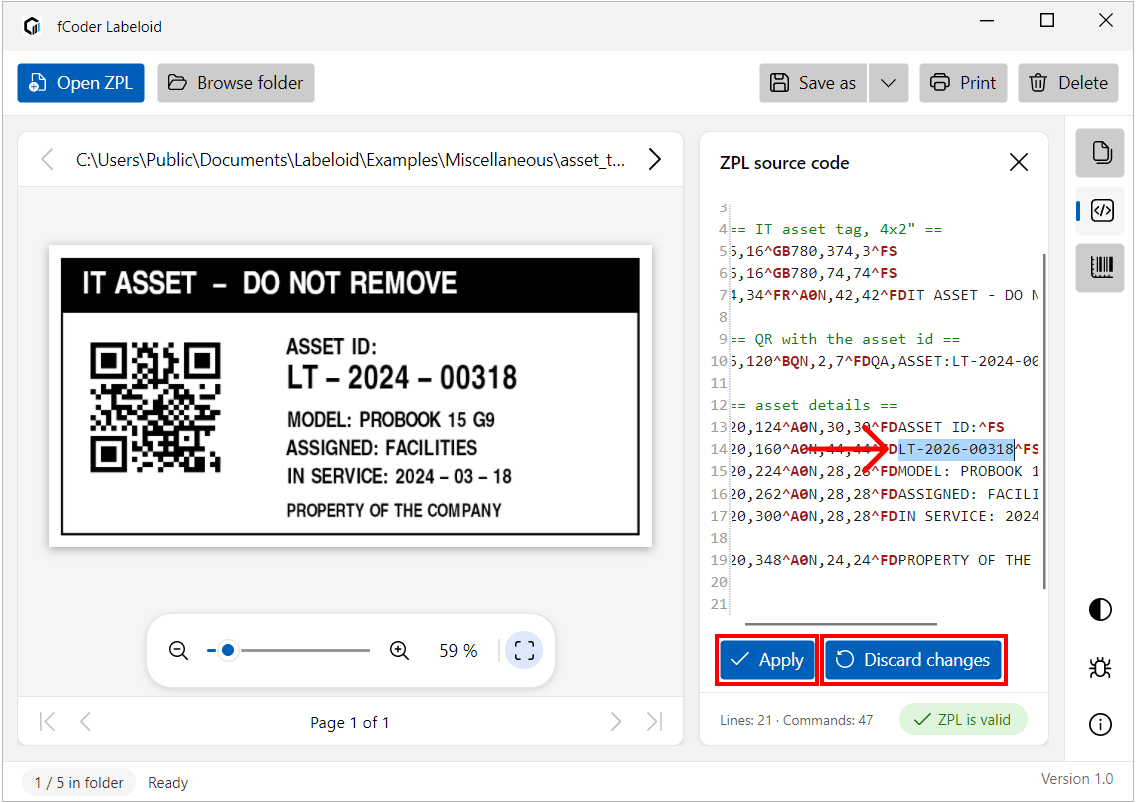
Use the syntax-highlighted editor to edit the ZPL source directly. The preview and diagnostics do not update while you type; they remain based on the last applied source until you click Apply.
Warning: In the current version, clicking Apply immediately writes your edits to the current ZPL file on your computer. It replaces the file's previous contents without a separate confirmation dialog.
- Open the ZPL source code panel and make the required changes.
- Click Apply to save the file and render the updated source.
- Check the new preview and diagnostics before continuing.
The label does not rerender while you type (currently, there is no “live preview”).
Warnings and errors refresh when you open a ZPL file, click Apply, or change a rendering parameter that rerenders the label.
Apply or discard changes
Apply saves the edited ZPL source to the current file and redraws the preview. It is the only way to preview source changes.
| Action | What happens to your edits | Saved to the ZPL file? |
|---|---|---|
| Click Apply | Your edits are written to the current ZPL file immediately, replacing its previous contents. | Yes |
| Click Discard changes | Edits made since the last Apply are removed, and the editor returns to the last saved version. | No |
| Open the previous or next ZPL file | Any unapplied edits to the current file are lost without warning. | No |
| Close Labeloid | Any unapplied edits are lost without warning. | No |
| Go to the previous or next page | Your edits stay in the editor, but they are not saved. Page navigation changes only the rendered page you are viewing. | No |
Warning: After you click Apply, Discard changes cannot restore the file contents that existed before that Apply. Apply has already overwritten the ZPL file on your computer.
Before applying, Ctrl+Z and Ctrl+Y undo or redo changes in the editor.
Set label size and rendering parameters
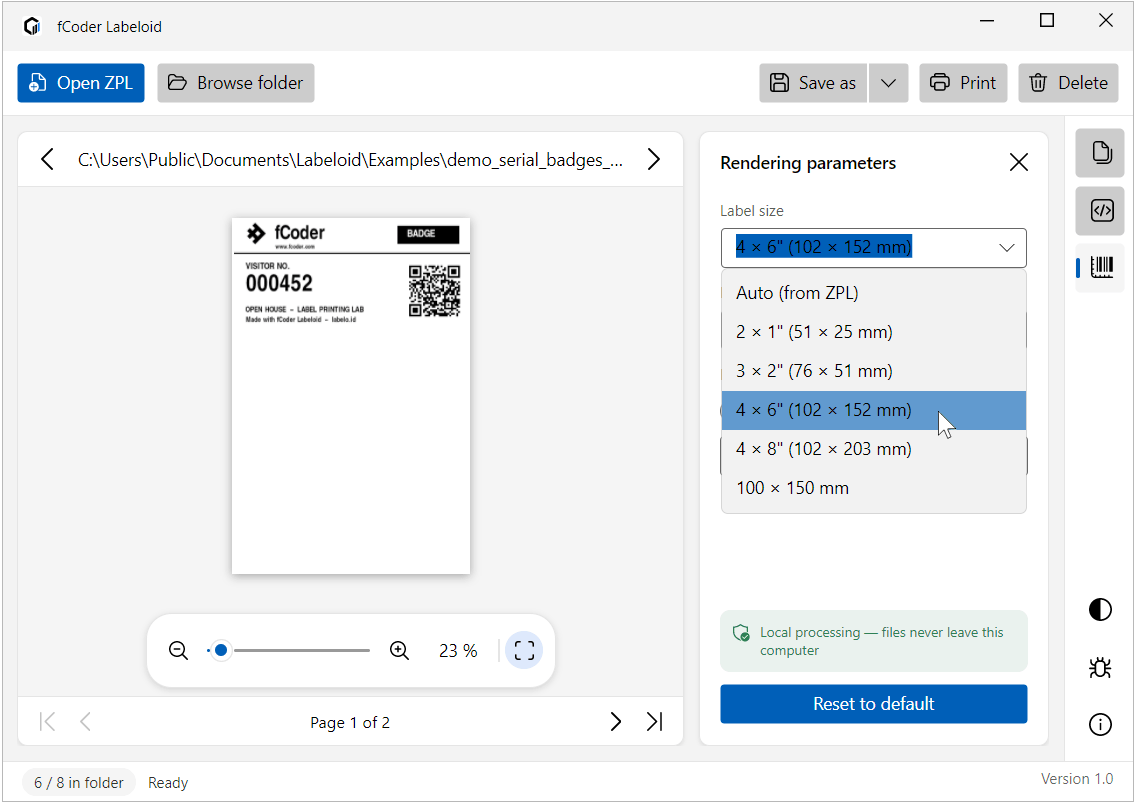
Use Rendering parameters to change the label size or print density used for rendering, or to limit a multi-label file to specific pages. These settings affect the preview and output without changing the ZPL source.
| Setting | Options | Effect |
|---|---|---|
| Label size | Auto (from ZPL), a preset, or a custom size (e.g., 100 × 100 mm, 10 × 5 cm, 3 × 1 in, or 3 × 1") | Sets the dimensions used for rendering. Custom sizes accept millimeters (mm), centimeters (cm), or inches written as in or ". The word inch is not accepted. |
| Print density | Preset or custom DPI (presets include 152 dpi, 203 dpi, 300 dpi, and 600 dpi) | Sets the print density used for rendering. |
| Pages | All or Range (e.g., 1,3,5-7 or 2-last) | Controls which pages are rendered. |
| Reset to default | — | Restores the default rendering parameters. |
With Auto (from ZPL), Labeloid uses the label dimensions defined in the ZPL when they are present.
- Open Rendering parameters.
- Choose the label size and print density you want to use.
- Select All or enter the page range you want.
- Check the updated preview, page count, and diagnostics.
The Pages setting applies to the preview, page navigation, and exported output. Label orientation comes from the ZPL; this panel has no separate orientation control.
Review warnings and diagnostics
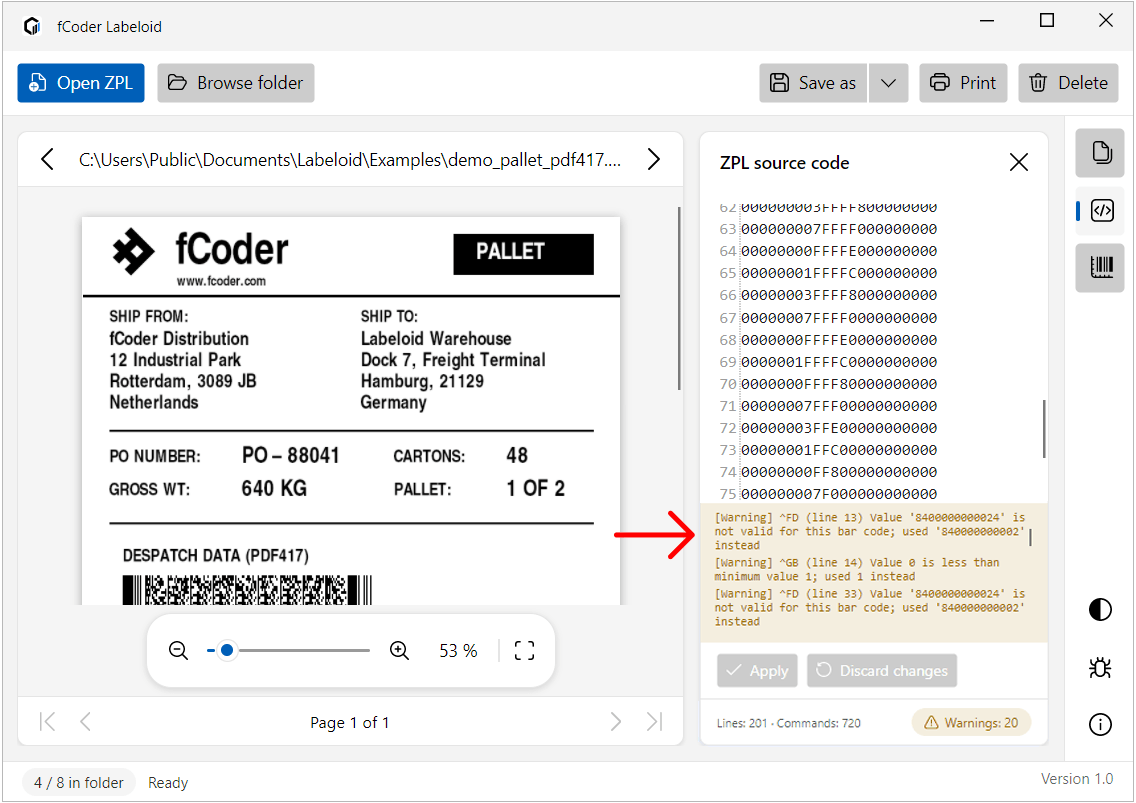
After rendering, review any warnings or errors reported by Labeloid. They can point to an unknown command, an invalid value, or other ZPL that may need attention.
Warnings do not update while you type. They refresh when you open a ZPL file, click Apply, or change a rendering parameter that rerenders the label.
You may see messages about:
- Unknown or unrecognized content.
- Invalid numeric values.
- Out-of-range or adjusted values.
- Invalid orientation values.
- Values that were too long and trimmed.
- Some barcode, font, or resource-related problems.
Click a warning to jump to and highlight the related command in the source editor. The status line at the bottom of the editor shows the current number of warnings and errors.
ZPL is valid means that Labeloid found no visible warnings or errors for the current render. It does not mean that every ZPL command or every physical-printer behavior has been validated.
If the label still looks unexpected, send a reproduction ZPL file and enough detail to reproduce the problem to Labeloid Support.
Export from Labeloid
Export saves the pages selected in Rendering parameters. For multi-label files, check the Pages setting before exporting.
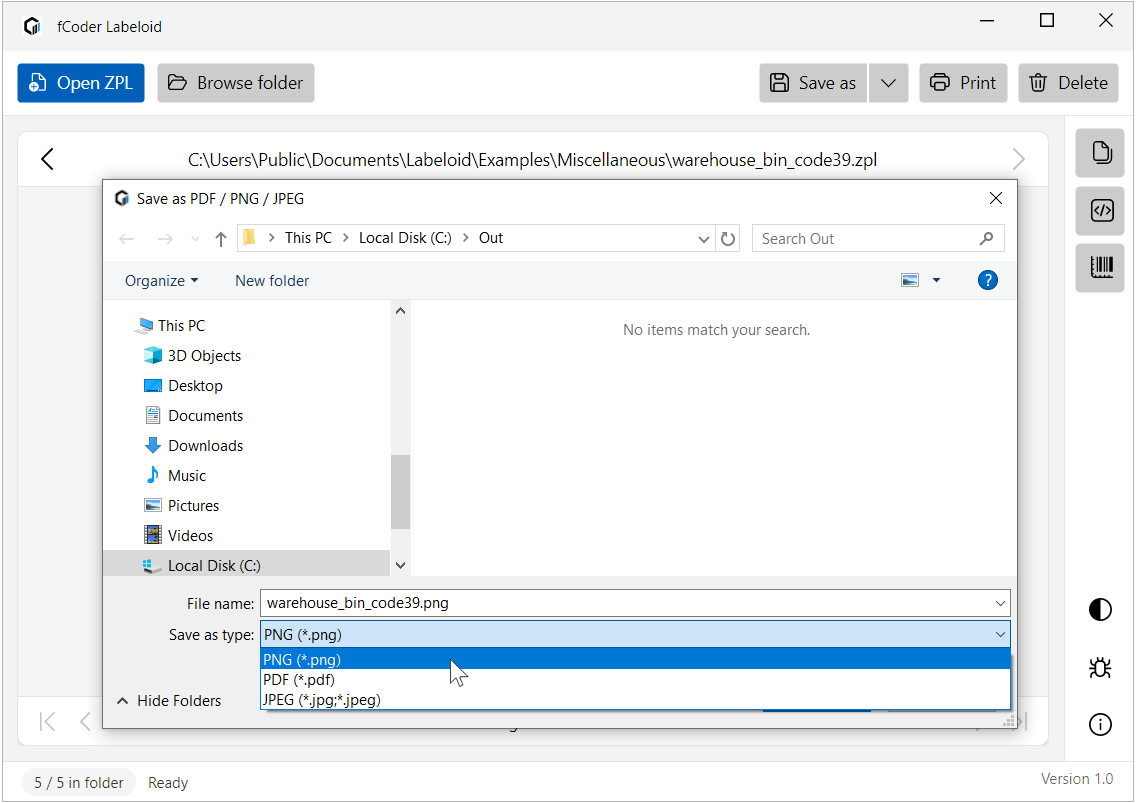
- Click Save as or open its format menu.
- Select PDF, PNG, or JPEG.
- Choose the destination folder and file name in the Windows Save dialog, then save the result.
PDF keeps the selected labels together in one multi-page document. PNG and JPEG create a separate image file for each selected page.
Warning: A multi-page PNG or JPEG export creates numbered page files (for example, name_001.png, name_002.png, name_003.png). If matching files already exist, Labeloid overwrites them without a separate confirmation dialog. Check the destination folder before exporting.
Copy the current preview as PNG
When you need the current preview in another application but do not need an export file, copy it directly to the Windows clipboard.
- Right-click the preview.
- Select Copy preview as PNG.
- Paste the image into the destination application.
The keyboard shortcut is Ctrl+Shift+C.
Print from Labeloid
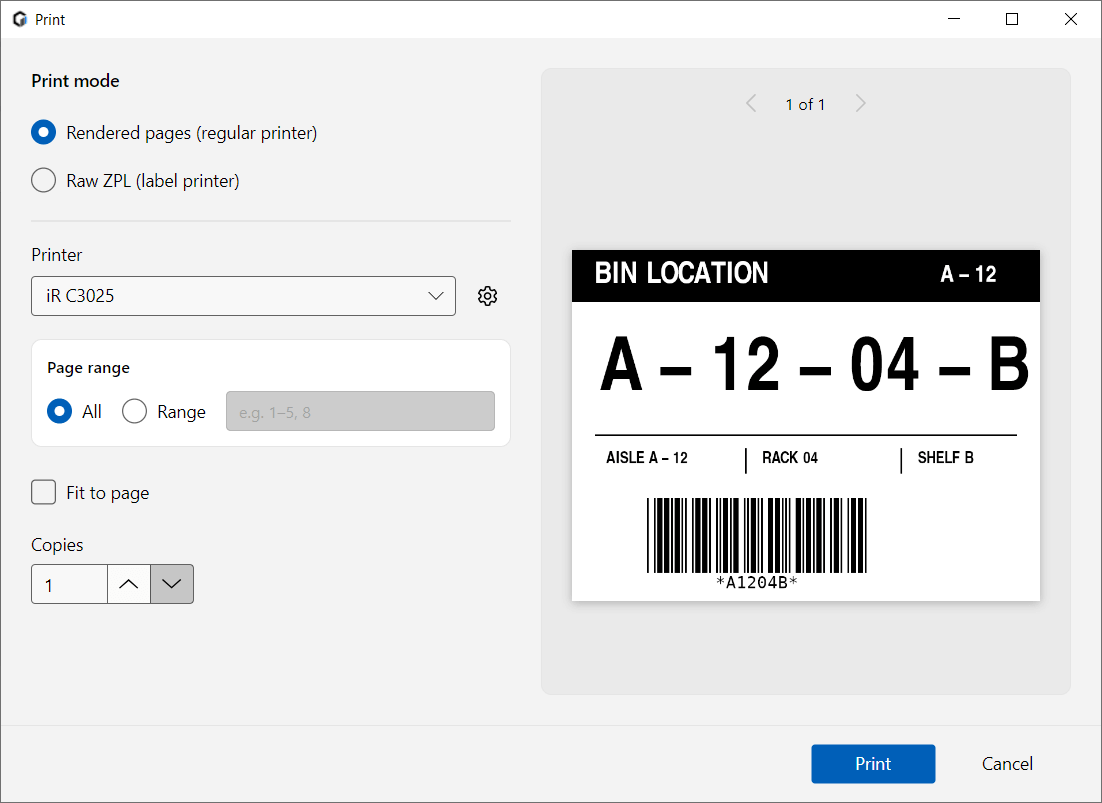
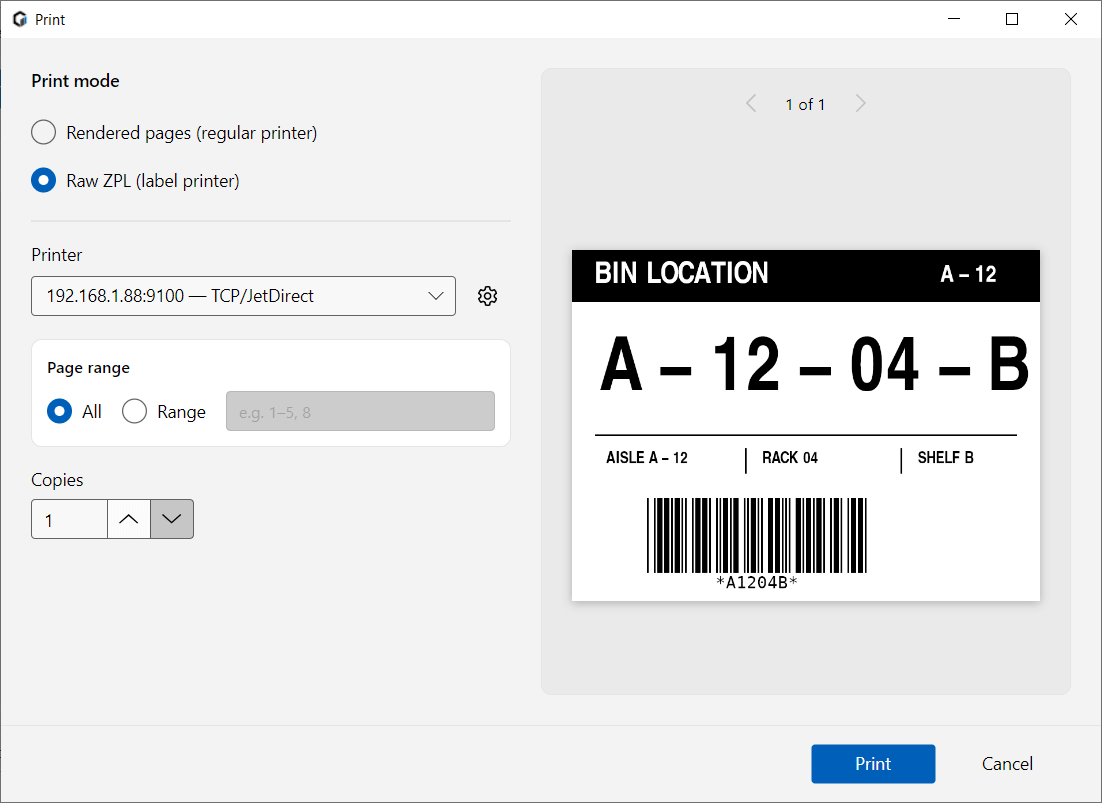
Labeloid has two print modes. It can print the label through a regular Windows printer, or send the ZPL source directly to a label printer.
Important: The Printer list changes with the selected print mode. Rendered pages (regular printer) uses a Windows printer queue. Raw ZPL (label printer) can use a Windows printer queue or Network printer (TCP/JetDirect).
| Print mode | What Labeloid sends | When to use it |
|---|---|---|
| Rendered pages (regular printer) | The rendered label pages. | When you want to print the rendered label through a regular Windows printer. |
| Raw ZPL (label printer) | The ZPL source itself. | When the label printer should receive the ZPL commands directly. |
Print rendered pages
- Click Print and select Rendered pages (regular printer).
- Select the printer you want to use from the Printer list.
- Select All or Range under Page range, then set Copies. In this mode, the range refers to rendered pages.
- Turn Fit to page on if needed.
- Review the print preview and click Print.
Print raw ZPL
- Click Print and select Raw ZPL (label printer).
- Select a printer from the Printer list. For a direct TCP connection, choose Network printer (TCP/JetDirect).
- If you selected a network printer, enter its host or IP address and port.
- Set Page range and Copies, then click Print.
In Raw ZPL mode, Page range refers to labels in the ZPL source rather than rendered pages.
Printing requirements depend on the selected mode and printer. The no-printer/no-driver requirement applies to previewing, not to every printing setup.
Delete a ZPL file
Use Delete to move the current ZPL file to the Windows Recycle Bin. Labeloid asks for confirmation first.
- Check that the correct file is open.
- Click Delete and confirm the action.
Labeloid then opens the next or previous file. If there are no other files in the folder list, Labeloid shows its empty start screen.
Note: You can restore the file from the Windows Recycle Bin until the bin is emptied.
Keyboard shortcuts
Use these shortcuts to move between files and pages or work in the source editor without reaching for the mouse.
| Shortcut | Action |
|---|---|
| Left Arrow / Right Arrow | Open the previous or next file when the source editor does not have focus. |
| PgUp / PgDn | Show the previous or next page. |
| Ctrl+Plus / Ctrl+Minus | Zoom the preview in or out. |
| Ctrl+0 | Return the preview to 100%. |
| Ctrl+mouse wheel | Zoom the preview. |
| Ctrl+Shift+C | Copy the current preview as PNG. |
| Ctrl+Z / Ctrl+Y | Undo or redo an edit in the source editor. |
| Ctrl+X / Ctrl+C / Ctrl+V | Cut, copy, or paste in the source editor. |
| Ctrl+A | Select all text in the source editor. |
Check the Labeloid version
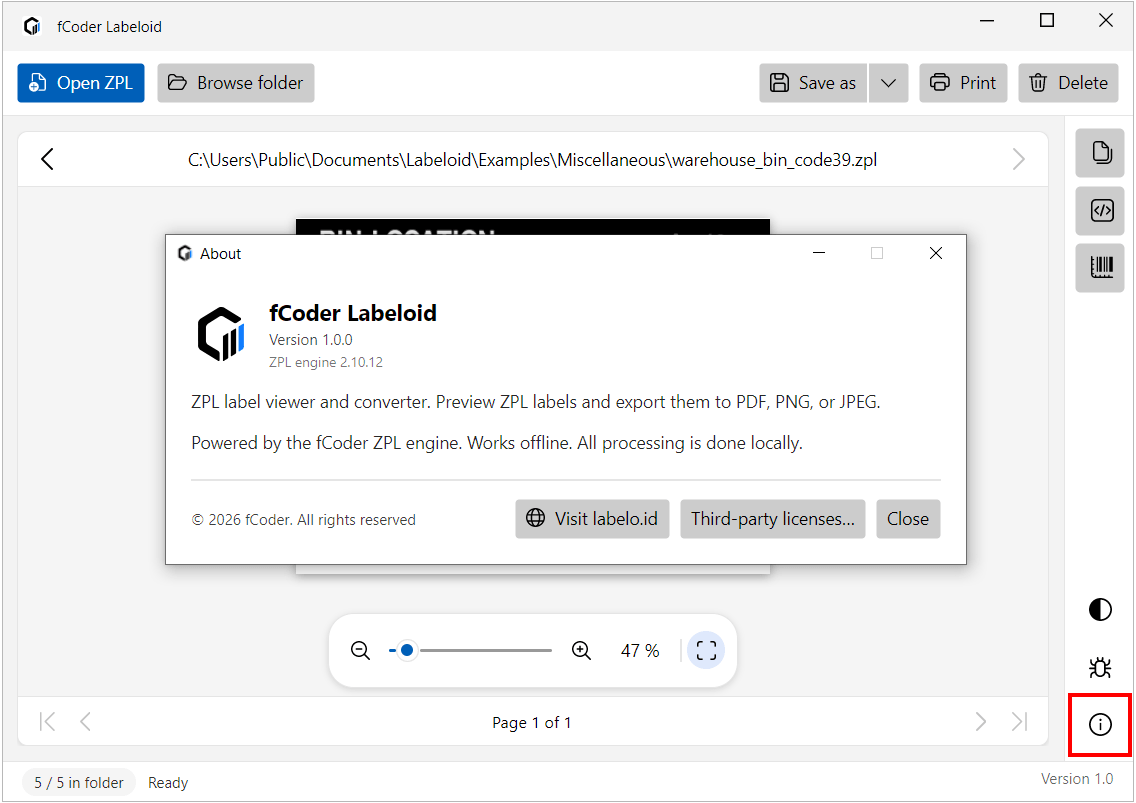
The installed Labeloid version appears in the lower-right corner of the main window. When Support needs the full product details, open About from the information control in the right sidebar.
Get support
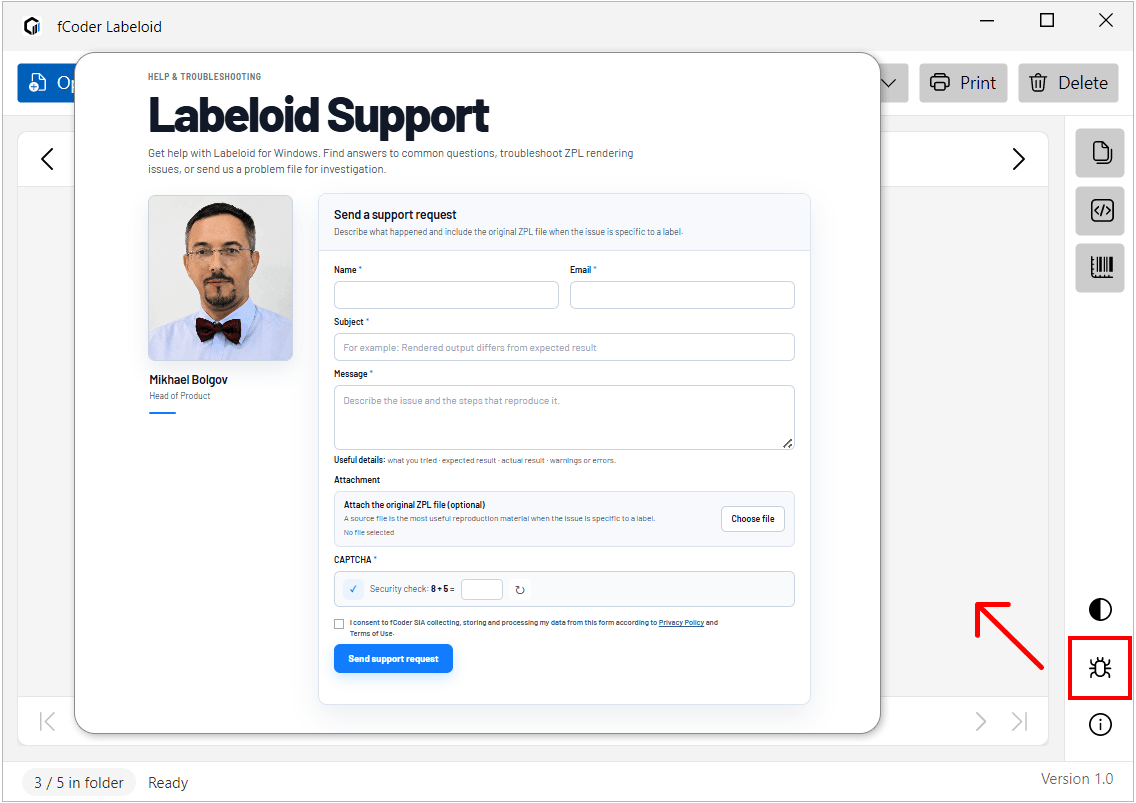
If you need help with a file or an unexpected result, click the bug/report icon in Labeloid to open the Labeloid Support page in your browser. Clicking this icon does not collect or send the ZPL file, logs, diagnostics, or any other support data.
Send a support request
Include enough detail to reproduce the problem:
- Complete the fields marked with an asterisk (*). Fields without an asterisk are optional and can be left blank.
- Describe what you expected, what happened instead, and the steps that reproduce it. Avoid adding personal information that is not needed to explain the issue.
- If the problem is specific to one label, attach a ZPL file only if you choose to share it.
- Complete the security and consent fields, then send the request.
Note: You do not need to provide optional personal information to send a support request. Only share information that is necessary for us to understand and investigate the problem.
For more information about data submitted through Support, review the Privacy Policy.
💡 Privacy tip: Please avoid sending ZPL files that contain sensitive, confidential, or personal information when those real values are not needed to reproduce the issue. If possible, first make a copy of the ZPL file, replace real text values in the copy with non-sensitive sample data using Labeloid's source editor, and send the sanitized copy instead. Remember that clicking Apply saves the edits to that file on your computer.